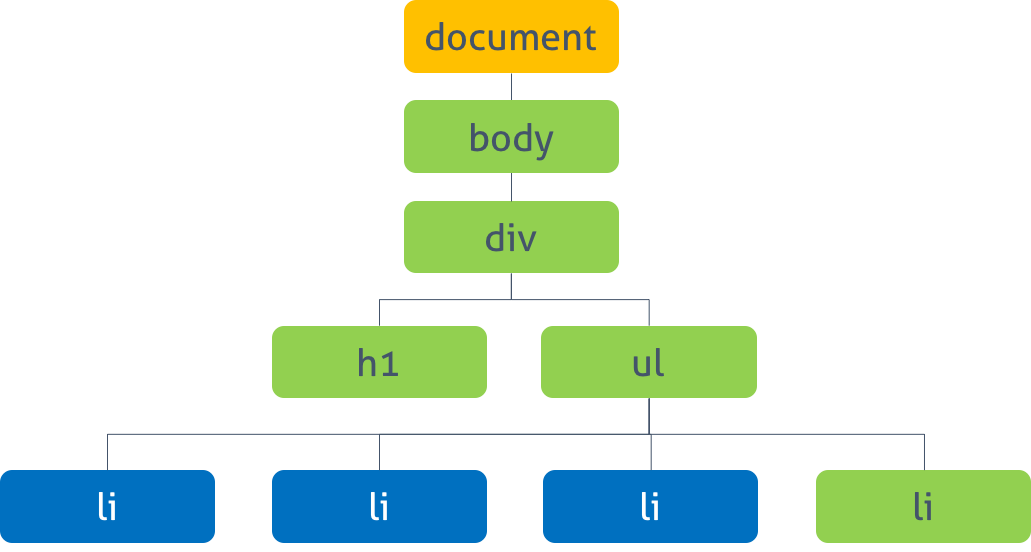
3. DOM Query / Traversing (요소에의 접근)
먼저, DOM 을 알아보기전에 아래와 같이 html 파일을 생성하고 element 들을 생성해준다.
그후 브라우저를 실행시키고, 콘솔창을 열자.
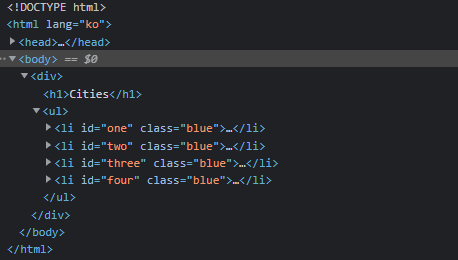
<!DOCTYPE html>
<html lang="ko">
<head>
    <meta charset="UTF-8">
    <link href="css/style.css">
    <script src="javascript/index.js" type="text/javascript"></script>
    <title>Document</title>
</head>
<body>
    <div>
        <h1>Cities</h1>
        <ul>
          <li id="one" class="red">Seoul</li>
          <li id="two" class="red">London</li>
          <li id="three" class="red">Newyork</li>
          <li id="four">Tokyo</li>
        </ul>
      </div>
</body>
</html>
이번 목차에서 다뤄보는 Method 😎
- 하나의 Element Node 선택
- 여러개의 Element Node 선택
3.1 하나의 요소 노드 선택(DOM Query)

1. document.getElementById(id)
- id Attribute 값으로 Element 노드를 한 개 선택한다. 복수개가 선택된 경우, 첫번째 Element만 반환한다.
- Return: HTMLElement를 상속받은 객체
- 모든 브라우저에서 동작
// id로 하나의 요소를 선택한다.
const elem = document.getElementById('one');
// 클래스 어트리뷰트의 값을 변경한다.
elem.className = 'blue';

// 그림: DOM tree의 객체 구성 참고
console.log(elem); // <li id="one" class="blue">Seoul</li>
console.log(elem.__proto__);           // HTMLLIElement
console.log(elem.__proto__.__proto__); // HTMLElement
console.log(elem.__proto__.__proto__.__proto__);           // Element
console.log(elem.__proto__.__proto__.__proto__.__proto__); // Node
결과 :

2. document.querySelector(cssSelector)
- CSS 셀렉터를 사용하여 Element 노드를 한 개 선택한다. 복수개가 선택된 경우, 첫번째 요소만 반환한다.
- Return: HTMLElement를 상속받은 객체
- IE8 이상의 브라우저에서 동작
// CSS 셀렉터를 이용해 요소를 선택한다
const elem = document.querySelector('li.red');
// 클래스 어트리뷰트의 값을 변경한다.
elem.className = 'blue';
결과 :


3.2 여러 개의 요소 노드 선택(DOM Query)
3. document.getElementsByClassName(class)
- class Attribute 값으로 element 노드를 모두 선택한다. 공백으로 구분하여 여러 개의 class를 지정할 수 있다.
- Return: HTMLCollection (live)
- IE9 이상의 브라우저에서 동작
// HTMLCollection을 반환한다. HTMLCollection은 live하다.
const elems = document.getElementsByClassName('red');

for (let i = 0; i < elems.length; i++) {
  // 클래스 어트리뷰트의 값을 변경한다.
  elems[i].className = 'blue';
}
결과 :


위 예제를 실행해 보면 예상대로(❓) 동작하지 않는다. (두번째 요소만 클래스 변경이 되지 않는다.) 🤷♂️
getElementsByClassName() 메소드의 반환값은 HTMLCollection이다. 이것은 return 값이 복수인 경우, HTMLElement의 list를 담아 반환하기 위한 객체로 배열과 비슷한 사용법을 가지고 있지만 배열은 아닌 유사배열(array-like object)이다. 또한 HTMLCollection은 실시간으로 Node의 상태 변경을 반영한다. (live HTMLCollection)
위 예제가 예상대로(❓) 동작하지 않은 이유를 알아보자.
elems.length는 3이므로 3번의 loop ( for문 )가 실행된다.
- i가 0일때
- elems의 첫 요소( li #one.red ) 의 class Attribute의 값이 className Property에 의해 red에서 blue로 변경된다. 이때 elems는 실시간으로 Node의 상태 변경을 반영하는 HTMLCollection 객체이다. elems의 첫 Element는 li#one.red에서 li#one.blue로 변경되었으므로 getElementsByClassName 메소드의 인자로 지정한 선택 조건(‘red’)과 더이상 부합하지 않게 되어 반환값에서 실시간으로 제거된다.
- i가 1일때
- elems에서 첫째 Element는 제거되었으므로 elems[1]은 3번째 Element ( li #three.red ) 가 된다.
- li #three.red의 class Attribute 값이 blue로 변경되고 마찬가지로 HTMLCollection에서 제외된다.
- i가 2일때
- HTMLCollection의 1,3번째 요소가 실시간으로 제거되었으므로 2번째 요소 ( li #two.red ) 만 남았다. 이때 elems.length는 1이므로 for 문의 조건식 i < elems.length가 false로 평가되어 반복을 종료한다. 따라서 elems에 남아 있는 2번째 li 요소 ( li #two.red ) 의 class 값은 변경되지 않는다.
이처럼 HTMLCollection는 실시간으로 Node의 상태 변경을 반영하기 때문에 loop가 필요한 경우 주의가 필요하다. 아래와 같은 방법으로 회피할 수 있다.
- 반복문을 역방향으로 돌린다.
const elems = document.getElementsByClassName('red');

for (let i = elems.length - 1; i >= 0; i--) {
  elems[i].className = 'blue';
}- while 반복문을 사용한다. 이때 elems에 요소가 남아 있지 않을 때까지 무한반복하기 위해 index는 0으로 고정시킨다.
const elems = document.getElementsByClassName('red');

let i = 0;
while (elems.length > i) { // elems에 요소가 남아 있지 않을 때까지 무한반복
  elems[i].className = 'blue';
  // i++;
}- HTMLCollection을 배열로 변경한다. 이 방법을 권장한다.
const elems = document.getElementsByClassName('red');

// 유사 배열 객체인 HTMLCollection을 배열로 변환한다.
// 배열로 변환된 HTMLCollection은 더 이상 live하지 않다.
console.log([...elems]); // [li#one.red, li#two.red, li#three.red]

[...elems].forEach(elem => elem.className = 'blue');- querySelectorAll 메소드를 사용하여 HTMLCollection(live)이 아닌 NodeList(non-live)를 반환하게 한다.
// querySelectorAll는 Nodelist(non-live)를 반환한다. IE8+
const elems = document.querySelectorAll('.red');

[...elems].forEach(elem => elem.className = 'blue');
결과 : (4가지 모두 class 의 name 이 변경되는 결과는 같음)


4. document.getElementsByTagName(tagName)
- Tag명으로 Element 노드를 모두 선택한다.
- Return: HTMLCollection (live)
- 모든 브라우저에서 동작
// HTMLCollection을 반환한다.
const elems = document.getElementsByTagName('li');

[...elems].forEach(elem => elem.className = 'blue');
결과 :

5. document.querySelectorAll(selector)
- 지정된 CSS 선택자를 사용하여 Element 노드를 모두 선택한다.
- Return: NodeList (non-live)
- IE8 이상의 브라우저에서 동작
// Nodelist를 반환한다.
const elems = document.querySelectorAll('li.red');

[...elems].forEach(elem => elem.className = 'blue');
결과 :


출처 및 참고 :
DOM | PoiemaWeb
브라우저는 웹 문서(HTML, XML, SVG)를 로드한 후, 파싱하여 DOM(문서 객체 모델. Document Object Model)을 생성한다. 파일로 만들어져 있는 웹 문서를 브라우저에 렌더링하기 위해서는 웹 문서를 브라우저
poiemaweb.com
https://developer.mozilla.org/ko/docs/Web/API/Document_Object_Model/Introduction
DOM 소개 - Web API | MDN
이 문서는 DOM에 대한 개념을 간략하게 소개하는 문서이다: DOM 이 무엇이며, 그것이 어떻게 HTML, XML (en-US) 문서들을 위한 구조를 제공하는지, 어떻게 DOM 에 접근하는지, API 가 어떻게 사용되는지에
developer.mozilla.org
'Front-End > DOM' 카테고리의 다른 글
| 문서 객체 모델(Document Object Model) : DOM - (3) 탐색 (0) | 2021.12.27 |
|---|---|
| 문서 객체 모델(Document Object Model) : DOM - (1) 개념 (1) | 2021.12.23 |

